Intro
Terminology
Installation
Automatic installation
Level 1. Export eprints metadata in
AMF
AMF metadata export module
Installation and configuration
What it does. Techinical details
The AMF generation
From eprint’s personal data to AMF person noun
Additional: from eprint type to AMF text type
AMF output plugin
Level 2. Personal id metadata
field
Level 3. Author identification aid
User interface
Search by name
Search by email address and by short-id
Problems and weaknesses
Undo feature (additional)
Implementation technical specification
Components and technology
Installation
cgi/pidaid script
pidaid.js add-on JavaScript
Level 4. The metadata update request
Configuration
object-dir-levels
parameter
Other considerations
GNU EPrints is an open-source online repository software for preprints and other scholarly materials. It’s primary usage scenario is self-archiving. It is being maintained and developed actively.
In ACIS we have specified and developed some features for cooperation with document submission services. We chose EPrints as the basis for a reference implementation of these features. This document explains in detail what features do we introduce into EPrints and how to use them.
EPrints uses some terms specificly. We will try with all care to avoid confusion. For this, we will use the EPrints’ terms in their EPrints-specific sense.
For instance, let’s take term document. In EPrints it means a rendering of a document in a file of a particular type. To mean a document as a piece of content, like a working paper or an article, which gets submitted to EPrints, they use word eprint (note lower case and singular number) and we will use that.
When EPrints talks about an installation of EPrints it would usually say “an archive”. An archive, therefore is a service, powered by EPrints.
One EPrints installation can power several archives. Each
EPrints archive has an id-name and an accordingly-named
subdirectory in {EPrints-dir}/archives/. That is
called an archive’s directory.
Each archive is configured via several configuration files.
Most basic and vital things are set in an XML file, named
{EPrints-dir}/archives/{archive-id}.xml. Several
other configuration files lie in a directory called
{EPrints-dir}/archives/{archive-id}/cfg.
This configuration directory contains the file
ArchiveConfig.pm, that holds the main configuration
parameters for an archive. When further below we refer to
the archive configuration, we mean the get_conf()
function in this file. This Perl function returns a hash
reference with the configuration parameters as the keys of
the hash.
A typical parameter setting looks like this:
# If 1, users can request the removal of their submissions from the archive
$c->{allow_user_removal_request} = 1;
If you need to add a configuration parameter, you’d want to
add a line like this, with your parameter name instead of
the allow_user_removal_request. You can do it
right before the return statement of the get_conf()
function, or, maybe, right after the initial lines:
sub get_conf
{
    my( $archiveinfo ) = @_;
    my $c = {};
Choose your topping.
A link on the topic:
The primary way to install these extensions onto an EPrints
service is to use the install.pl script in the
EPrints directory of ACIS. Give the path to your
EPrints archive directory as a parameter to that script and
follow the instructions. For example:
$ cd ACIS-1.2.3-20051010d/EPrints
$ perl install.pl /opt/eprints2/archive/Archive
If this does not work for you, there are more details on installation in the Installation of ACIS’ extentsions to EPrints document.
The further sections of this document contain installation and configuration instructions which are specific to that particular level of ACIS-EPrints cooperation. But all that is covered by the automatic installation and is present here for historical reasons. You may also use it to change an existing configuration.
EPrints can export its metadata in a simple XML format. It
includes a utility export_xml for that. EPrints
has an OAI-PMH
interface in it, and so, includes a Dublin Core conversion.
But we need:
each document’s data in a separate datafile;
datafiles created, updated and deleted immediately as EPrints editors accept or remove individual eprints.
And that’s what our AMF metadata export does.
The module’s name is ACIS::EPrints::MetadataExport::AMF and
it is located in the
EPrints/perl_lib/ACIS/EPrints/MetadataExport/AMF.pm
file.
The installation script
will patch the perl_lib/EPrints/EPrint.pm module.
This will make EPrints call our AMF export module exactly
when it is needed: on occasions when a new eprints has been
created (accepted into the repository), when an eprint data
has been modified and when an eprint is being deleted. It
will add several lines into the generate_static() method of
the EPrints::EPrints class:
require ACIS::EPrints::MetadataExport::AMF;
if ( $ds_id eq 'archive' ) {
   ACIS::EPrints::MetadataExport::AMF::export_metadata( $self );
}
and these two lines into the _move_from_archive() method:
require ACIS::EPrints::MetadataExport::AMF;
ACIS::EPrints::MetadataExport::AMF::clear_metadata( $self );
To configure the AMF export module itself, add two
configuration parameters to the get_conf() subroutine of
your archive’s configuration cfg/ArchiveConfig.pm:
eprint_metadata_export_AMF_direprint_metadata_export_AMF_idprefixExample:
$c->{eprint_metadata_export_AMF_dir} = "/opt/eprints2/archives/Musasi/amf";
$c->{eprint_metadata_export_AMF_idprefix} = "Musasi:";
Upon a call to export_metadata() function in this
module, it will:
get and check the configuration parameters specified above.
If the directory parameter points to an inexistant directory, try to create it. Fail silently if this fails.
extract internal numeric eprint identifier from the passed EPRINT object;
construct datafile pathname from the configuration-specified directory and the numeric id as follows:
my $filename = $dir . "/" . $id . ".amf.xml";
create empty AMF text object with ID
"$prefix$id". Populate it with other data
of the eprint (see next section).
get XML rendering of it;
write it to the file, adding standard AMF prolog and epilog (the <amf> element) along the way.
The clear_metadata() function in this
module will:
get and check the directory configuration parameter specified above;
build the datafile pathname exactly as in previous function;
delete the file if it exists.
Saskatoon doc says that AMF from EPrints must reflect:
the work’s title
the authors’ full names
EPrints’ internal id of the eprint
the URL of the work’s page in EPrints
Given an eprint object, we first build an empty AMF text
noun with ID "$prefix$id", where
$prefix comes from configuration
(eprint_metadata_export_AMF_idprefix) and
$id is the eprint’s internal id (the
eprintid field). That covers point no. 3.
Then we add title and displaypage
adjectives, these are points 1 and 4.
Then we go through all the work’s authors (the
creators field) and editors (the
editors field). For each of them we create a
person noun, see next section. And then we save each
author data via the hasauthor verb and each editor
data via the haseditor verb. That gives us point
number 2.
That is made in a separate function decode_person().
First, we create an empty AMF person noun.
We populate the person noun with the givenname and
familyname adjectives, if corresponding fields are
defined. We use the EPrints utility function
EPrints::Utils::make_name_string() to get full
name of the person. Save result as adjective name.
We check the personal data for presence of the id
field. If defined, we check it for what kind of value it
contains. It may contain a short-id or an email. If it
contains an email address, we save it into an email
adjective. If it is a short-id, we save it into
identifier adjective. It is part of level 2, actually.
Each eprint object has a type field. EPrints is
flexible in the types of document that one can store in it.
Administrators can change the available types, can define
new types. It means the range of values that this field can
take is not fully defined. We will rely on default types
configuration. Given that this is not a required feature,
we will not try too hard to find a matching AMF type.
Here are the basic eprints types, defined in
defaultcfg/metadata-types.xml (from EPrints dir) and
their AMF counterpart, if defined.
| eprint type field | AMF text type adjective |
|---|---|
article | article |
book | book |
book_section | bookitem |
conference_item | conferencepaper |
monograph |
see below |
thesis |
- |
patent |
- |
other |
- |
Eprints of type monograph also have a
monograph_type field. This field takes
following values (again with their AMF text type equivalents):
| eprint monograph_type field | AMF text type adjective |
|---|---|
technical_report |
preprint |
project_report |
- |
documentation |
- |
manual | - |
working_paper |
preprint |
discussion_paper |
preprint |
other |
- |
EPrints, since version 2.3.14, supports plugins for metadata
conversion and output. Plugins are special modules, made as
drop-in files. You simply put the plugins you want to use
into the plugins/output/ directory of your EPrints
installation (or to that of your EPrints archive), restart
EPrints (i.e. Apache) and they work. Default EPrints
installation already has a number of plugins pre-installed:
for BibTeX and for a simple XML format metadata output.
One of the ways to see them working is to look at such URL:
http://your.eprints.url/perl/export/#id#
where http://your.eprints.url is the base URL
of your EPrints service, and #id# is an actual
id of an eprint (a submission) in your service.
You should then see a page offering you metadata of this item in different formats, each format representing an installed plugin.
Now the AMF plugin is in ACIS file
EPrints/plugins/output/amf. But if you followed the
general installation
instruction above, it is already installed and should be
working.
Note that the AMF plugin depends on the ACIS::EPrints::MetadataExport::AMF module, described above.
For each person, author or editor of a work, EPrints asks and stores a number of fields. Main are the name fields, like given name and family name. In default installations there is also a field called “Creators email (if known)”. Internally and by design it is named “id”. We will use it for the personal identifiers in author/editor metadata.
Typical traditional usage of this field is for email addresses. We will assume it is used for both email addresses and personal id.
EPrints allows administrator to configure the field labels. We suggest to change this field’s label to “Id or email”.
To change the field’s label edit the phrases-en.xml
file in your archive’s configuration directory. Find and
modify the <ep:phrase> items identified
eprint_fieldname_creators_id and
eprint_fieldname_editors_id. The first one
looks like this:
<ep:phrase ref="eprint_fieldname_creators_id">Creators email (if known)</ep:phrase>
If your installation of EPrints does not have this field,
you need to enable it in your archive’s
cfg/ArchiveMetadataFieldsConfig.pm file.
For that:
find line which says
$fields->{eprint} = [
near below it find the line, which starts with
{ name => "creators", type => "name",
and make sure hasid parameter in this
block is set to 1. The block will look like this:
    { name => "creators", type => "name", multiple => 1, input_boxes => 4,
            hasid => 1, input_id_cols=>20,
            family_first=>1, hide_honourific=>1, hide_lineage=>1 },
Do the same for the “editors” field. Here the block starts with
{ name => "editors", type => "name"
Again, set parameter hasid to 1.
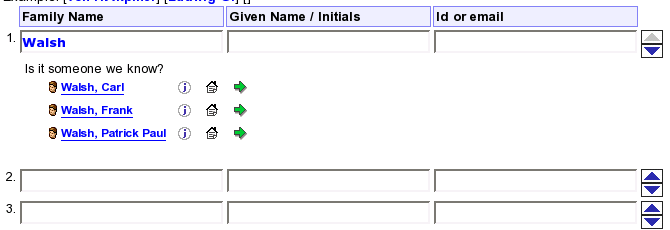
This is what you get on the “Core Bibliographic Information” page of EPrints if you follow the above instructions:
![]()
If you had any problems with above instructions, you may want to look at Configuring the Archive Metadata section of the EPrints documentation.
An eprint submission in EPrints takes a number of screens to go through. We will modify just one of the screens, the one called “Core Bibliographic Information” in the default English-language installation.
On this screen a user enters title of the work being submited and data about its authors. As she enters author information, we will search the records database in ACIS to see if we have any matching records. And we offer found personal records for the user to choose. If the user accepts an offered record, we automatically fill in the name and id fields for this author. Having correct short-id in the document metadata is what we want after all.
It is important that we minimize user errors at this stage. If many EPrints users start assigning documents to wrong persons, it would cause bad metadata.
We do not change the normal user workflow. We avoid intervening in it. Instead we try to gently offer our help, where we can.
The next section starts a functional specification of the interface changes that we introduce. Later on there is a description of the technical side of things: how to install and configure it, what components does it consist of and they work.
This is a functional specification of the user interface enhancements to EPrints at level 3. The basic general logic of the enhancements is right below. In further sections you’ll see it detailed.
For data of the authors the “Core Bibliographic Information” screen has a table with input fields in it. After level 2, the columns are titled: “Family name”, “Given name / Initials”, “Id or email”. (As an aside, the order of the columns on the screen may be different. You can configure EPrints to display “Given name / Initials” before the “Family name”.)
The user types her information about the authors into these fields. We look at what she types, do search queries of our database. If we have something to say, we insert a row into the author data input table and put our message into this row. This shifts further rows of the table further below. So our message appears just below the relevant input fields.
There should be no problem if the user does not notice our message, does not understands it or prefers to ignore it. She can ignore it and go on. When the user starts working with another row in the personal data table, we will make the message that was relevant to the previous author disappear. If the user returns back to the row (the field), which caused the message, we display it again.
Our message is usually a menu of personal records that our
search yielded. We do not display the menu if we have too
many search results. (That would probably mean the search
conditions are too vague to be useful.) Too many is
more than a magical number max_results, with 15 as
the default value. It is configurable via the ACIS::PIDAID module.
The menu is shown as a little table. Each row of the table represents one person. Next to the person’s name is a mini-icon link to further information about the person — to his or her profile page. Then comes a link to his or her homepage. Next is an inviting mini-icon to choose the person.
A click on the name or on the choose icon would mean user has made a choice. It would mean she was entering data about that particular person. At this point we remove the menu and fill in the personal data fields with the data that we have: the family name, the given name and the id.
If search yielded any results, we always build a menu of these results and display it. If search yielded no results or too many results and there is a previously-generated menu, then we remove the menu.
A user has typed in the title of the work, and then switched to the next input field, i.e. the family name input box for the first author. She types the first few letters of the author’s surname. The page makes a search and brings up a little list of personal names, right below the input box. User finds a matching person in this list, clicks on that person’s name. Immediately the family, the given name and the id/email input boxes are filled in with data from ACIS. Then the menu disappears. The user is happy because she doesn’t have to type that info manually. We get an exactly identified author in the eprint’s metadata.
The user clicks on the second author’s family name input box and continues the process.
Name search is case-insensitive.
We attempt to search for the matching personal records each time user acts in a name input box, be it family name box or given name box. Pressing a key, entering or leaving an input box are the acts to react upon.
If search yielded any results, we build a menu of these results. If the search yielded no results or too many results and there is a previously-generated menu, then we remove the menu.
When user is in an input box, we assume she is editing it and probably has not finished it yet. When focus belongs to the family input box, we search for lastnames starting with what user has typed so far. So if user typed “Mendel”, it would match both “Mendel” and “Mendelssohn”.
As soon as user leaves a family box, we assume the surname typed in it is complete and cut off the items, which do not produce a whole-string match. So if user left the family name box with “Mendel” in it, only this family name will match.
Search requests are asynchronous, which means the page does not stop reacting to user actions while a search is taking place. Search results are processed only when a response from server has arrived.
A user types in the title of a work and then enters the family name and the given name of an author. ACIS doesn’t recognize the name for some reason. It may be a consequence of a different (not known to ACIS) variation of the name spelling. It may be that ACIS did find some matching records, but user didn’t notice or prefers not to use the menu of the offered records.
Then the user switches to the next field, the “Id or email” box. She enters the author’s email address and presses “TAB” key. TAB key switches focus to the next row of the table. The page sends a request to check if that email address is known to ACIS. ACIS finds a personal record with a matching email address and offers that personal record to the user. User clicks on the offered personal name. The family, the given name input boxes are filled in with data from ACIS. The value of the email address that she entered is replaced with the person’s short-id.
A user enters personal name of an author. For some reason
ACIS doesn’t recognize the person or user doesn’t use the
menu offered. Then she TABs to the id / email field and
types in the identifier for the person that she knows.
After she types in the first 4 characters
(e.g. “pme4”) a message appears below the input
box: “Id ‘pme4’ belongs to:” with a single-item menu below
it. The item is the record, which corresponds to this
short-id.
Soon after she types another char, the page rechecks and offers her a new record — the one that corresponds to the current value in the short-id input box.
Once she typed the identifier completely (it may be 4, 5, 6 characters long), she sees the name of the person she meant. She is now sure that she did no mistake.
An advanced experienced user comes to the page with the short-id of the author at hand. Instead of entering the author’s name, she enters the short-id and waits to see the page has recognized it.
A second later she sees the expected name (i.e. name of the author), clicks on it and name fields are automatically filled in. Everybody is happy.
A user enters the name details for a person and then enters an identifier for him. She doesn’t look at the messages appearing or they were not appearing because of slow connection or because the server was pretty loaded at the moment.
She goes on to complete details of the next author/creator. A few moments away the identifier that she entered becomes red-colored. She notices that, hoovers mouse cursor over the field, and sees a little floating hint: “No such record: id unknown”.
She clicks on the field. Immediately she sees this same message below the field. She rechecks her notes and finds out she made a mistake. She corrects the value of the field, waits a second or two to see if the page complains about it. Soon she sees that all is fine this time: the page offers the record she meant. She continues to enter next person’s details. The menu is hidden as she starts to type another person’s family name.
Email search and short-id search happen in the same input field. The page looks at the format of the value string to understand, whether it is an email or an id.
The email search and the short-id search are case-insensitive.
The id and email searches do exact full-string matching.
We attempt to search for the matching personal records each time user acts in the input box. Pressing a key, entering or leaving an input box are the actions to react upon.
If search yielded any results, we build a menu of these results. If search yielded no results or too many results and there is a previously-generated menu, then we remove the menu.
Search requests are asynchronous, which means the page does not stop reacting to user actions while a search is taking place. Search results are processed only when a response from server has arrived.
If user has left the field with a non-empty value, which
does not look like an email address and is not a valid
short-id (there was a successful search by short-id attempt,
which returned an empty result list), the value is shown in
red color and a hint “No such record: id unknown” is
attached to the field (via title attribute).
If user enters the field while it is value is known to be invalid, we display message “No such record: id ‘…’ unknown.” below the input field; red color and the floating hint is removed.
When such message is shown and user starts to edit the value, the message is removed.
The user interface enhancements, that are described above, have a number of potential problems and weak sides.
First, most users (until they learn) will not expect the search results menu and other messages to appear. We hope it will be a nice surprise. But novice users may feel irritated by unexpected, unrequested things appearing on a page.
Second, latency and server load problem. If the user has a slow network connection or the server, handling search queries, is overloaded, the features may distort the experience. At the same time, with growing usage of an EPrints installation, the number of db search queries may grow dramatically, thus increasing the load on the EPrints service server and the ACIS database server.
Situation is as follows: the page
sends a CGI query back to EPrints, to the cgi/pidaid
script. The cgi/pidaid script sends a database query
to the ACIS’ MySQL server. MySQL returns some result. The
cgi/pidaid XML-encodes it and returns to the
page.
Each component of the structure may become a bottleneck.
But I guess that MySQL is under biggest strain here, because
cgi/pidaid will run under mod_perl, so it won’t eat too much
resources — no new processes to start for each request, at
least. MySQL also doesn’t have to start a process for each
request, but it must search the database. Of course, it
becomes even more strained if several EPrints installations
would query the same ACIS database at the same time.
On the other hand, how many document submissions are we going to handle? I doubt any of the existing EPrints installations has 10 submissions per day on average. But of course, this will grow. Or at least we have to account for that.
Third, such implementation may create accessibility problems for people with disabilities, for users with speach-browsers, with memory and orientation difficulties.
Fourth, there is no way for the user to enter both an email address and a short-id for a person.
Fifth, with the current setup, having chosen an item from a menu, user has no way to undo this choice and to return to the previous state.
Sixth, the for technical reasons, it won’t work for users with older versions of the browsers and some modern, but incompatible browsers (e.g. Opera 7 and earlier). For those users it will work as a usual EPrints service, only with a differently-named email field.
Whenever user gets names from a personal records menu inserted into the name and id fields, right under the id box appears a small “undo choice” button. If user clicks on the button, the previous values are restored and the button disappears. The previous values are the ones that were in those fields at the moment when the user clicked on a menu item.
If after making a choice the user starts editing any of the name field values or the id field value, the button disappears also. (Otherwise it may confusingly suggest that it is capable of undoing his editing.)
Our enhancement of EPrints for author/person identification aid consists of:
a CGI script added to EPrints, file cgi/pidaid;
JavaScript code, file pidaid.js;
little additional CSS styling, file pidaid.css.
The JavaScript part defines certain reactions to certain user actions (events). These reactions include background queries back to server and modification of the page without full page reload. JavaScript communicates with the CGI script on the EPrints server via XMLHttpRequest technology (see below).
The ACIS::PIDAID module executes the database queries for the CGI script.
Copy sql_helper/sql_helper.pm and
sql_helper/sql_result.pm files from ACIS
distribution into the perl_lib directory of the
EPrints installation directory.
Change to the EPrints/ directory of ACIS
distribution.
Copy cgi/pidaid into cgi/ dir of the
EPrints installation.
Copy recursively perl_lib directory to the EPrints
installation directory.
Copy pidaid.js and pidaid.css and
images/ directory (recursively) to the html/en/
dir of the EPrints archive.
Edit cfg/template-en.xml in the archive directory to
add pidaid.js and pidaid.css to every HTML
page built. It may now look like this:
...
<html xmlns="http://www.w3.org/1999/xhtml"
      xmlns:ep="http://eprints.org/ep2/template">
  <head>
    <title>&archivename; - <ep:pin ref="title" textonly="yes" /></title>
    <style style="text/css" media="screen">
@import  url(&base_url;/eprints.css);
@import  url(&base_url;/pidaid.css);     /* PIDAID */
    </style>
    <style style="text/css" media="print">
@import  url(&base_url;/eprints.css);
@import  url(&base_url;/pidaid.css);     /* PIDAID */
@import  url(&base_url;/print.css);
    </style>
    <!-- and PIDAID JavaScript: -->
    <script type='text/javascript' src='&base_url;/pidaid.js' />
    <link rel="Top" href="&frontpage;" />
...
Obtain mysql access parameters from the ACIS service
administrator. Then configure the ACIS::PIDAID module by defining the
$ACIS::PIDAID::CONF variable in the archive
configuration file (cfg/ArchiveConfig.pm). It may
look like this:
$ACIS::PIDAID::CONF = {
   host => 'acis.super.edu',
   port => '9099',
   db   => 'ACIS',
   user => 'peter',
   pass => 'jolly',
   max_results => '25', # optional, default: 15
};
Stop and then start again EPrints, i.e. the web server it
runs on. The usual apachectl restart may
not be enough — you need to separately stop and then
start it.
cgi/pidaid scriptThis CGI script searches for personal records. The script
is installed into EPrints’ cgi/ directory. It
accepts HTTP GET and POST requests and the usual CGI-style
parameters. Returns an XML document.
Usage:
http://eprints.super.edu/perl/pidaid?l=mendel*
http://eprints.super.edu/perl/pidaid?s=pme4
Response’s Content-type is “text/xml; charset=utf-8”.
The script uses the ACIS::PIDAID module to make the actual searches and the ACIS::PIDAID::XML module to produce an XML string of search results.
The CGI parameters this script accepts:
f: given name to search by;
l: family name to search by;
s: short-id to search by;
e: email address to search by.
There are three search modes:
by name — l and f parameters are used;
by short-id — s parameter is used;
by email address — e parameter is used.
Specifying together l and s or l
and e or s and e makes no sense
and return from such requests is not defined.
The script need not to be configured in any way; it is assumed that admin has configured the ACIS::PIDAID module.
If a search request returns too many matching records, the
script will return XML string
“<toomany/>”.
In case of an internal problem the script may return XML
string “<problem/>”.
The cgi/pidaid script employs the normal EPrints’
infrastructure for accepting and processing requests. It
creates an EPrints::Session object and uses it to get the
input parameters parsed.
pidaid.js add-on JavaScriptXMLHttpRequest is a piece of browser technology that bacame widely known just recently, although existed for a long while now. It allows to create “responsive” web pages. With it a web page can communicate to a server and then modify itself based on what server returned. To modify itself, the page can use the HTML DOM interface. XMLHttpRequest is a client-side technology and requires in-browser scripting; normally JavaScript is used.
XMLHttpRequest has asynchronous mode, when communication with the server happens in the background. While a request is sent and a response is recieved, the page is still usable, it can react to user input in a usual way. This contrasts with what happens at the page reload phase of a usual user-to-a-website interaction.
The XMLHttpRequest requests can contain parameters, as if sent by a submitted web form. The only important limitation is that most browsers restrict to which servers it can send requests; the server must be on the same domain name as the server from which the current page was loaded. This is a security measure.
Response to a XMLHttpRequest request can be of any type, e.g. HTML or plain text; just as usual HTTP responses can be. But if a response contains some data in XML, XMLHttpRequest provides an interface to parse and traverse it. Again it is DOM interface.
Not all browsers support XMLHttpRequest. It works in Internet Explorer 5.0 and higher, in Mozilla 1.0+ and FireFox; Safari 1.2+. It does not work in Opera 7 and earlier, but Opera 8 beta already has an early implementation of it. So, we can hope that soon there will be very little number of web users who don’t have it. Of course, some users have JavaScript disabled. Nothing we can do about it.
Here are some examples of using the technology:
Meetup.com registration form. Choose a country and see how the page reacts — it loads the list of cities from the server.
Some external resources:
This section offers a brief, simplified overview of how the
pidaid.js script works.
The script is executed in a user’s browser in context of an EPrints webpage.
It starts by calling the install_check_handlers()
function (via the page’s body “onload” event). The function
goes through all the <input> elements of the page.
Along the way, it checks each of them to see if it looks
like a personal data entry element. If there are no such
elements, this is not a page that is interesting to us.
For each group of personal data entry input boxes on the page the function creates an object and puts it into the global name_groups array. We use it to store certain parameters of each group of controls. (Each group of controls corresponds to one person, whose name data can possibly be entered on the page.)
Also, as install_check_handlers() cycles through
the <input> elements and finds groups of controls, it
assigns handlers for “onfocus”, “onblur” and “onkeyup” events
to some of them. To be precise, it assigns handlers for
these events to the family name, given name and id/email
input boxes. Depending on the EPrints configuration, name
controls may also include honourific name and lineage name
boxes. They are disabled by default and we ignore them even
if they are present.
The handler functions that are assigned to the above-mentioned events are different; they depend on the event type and the input box type to correctly implement all details of the user interface.
What all handler functions share in common is that they
attempt to launch a search request. For instance, all
family name and given name box handlers call
check_name() function, which starts a search by
name.
A search is done by creating an XMLHttpRequest object, and
using it to send a request to the cgi/pidaid script.
The send_request() function does that. Each
request includes search parameters, e.g. a family name user
has typed so far. Before a request is sent, a call-back
function is set for processing the response. If the request
was sent successfully and a response arrives, the
process_search_results() function analyses the
response and takes further action.
It uses the data from the search response to build a
personal records menu (create_menu() function) or
produce some other message or hide a previously shown
message.
Here it becomes important to know that personal data entry
input boxes in EPrints are arranged in a HTML table. One
table row — one person. To show a message we create a new
row in the table and a cell in that row and put our message
into that cell. (The cell’s TD element has
colspan attribute set to 4 value—it spans
4 table columns.)
When we build a menu, we create a new table (inside the message cell), and put each personal record item in a separate row. Each menu table row presents a clickable personal name and has links to homepage & profile page and an “inviting” choice mini-icon. The personal name and the choice mini-icon have “onclick” event handled by a choice function. The choice function sets the name and id input boxes to the values of the corresponding personal record and hides the menu.
That’s how it works, basically. You are welcome to look into the script source if you need more details; it has some comments for help.
These are the rules the script follows for minimal efficiency and to avoid server overload problems.
At any given time there is only one search request going on. If necessary, the new one is sent immediately after the first one has finished.
Explanation. It may happen that user continued entering data while a search request was being sent and a response was recieved. This may mean circumstances have changed and a new request has to be sent. But if there is a previous request going on, we do not send a new one. We set a flag instead, which instructs the response-processing function to restart the search when it is executed. And the response-processing function will run and check this flag only when the previous request resulted in a response.
We maintain a simple global cache for search requests to the server (the cache variable). It ensures we never have to repeat the same query twice.
We never actually search when the search expression doesn’t look useful, for example, when the search field’s value is empty.
We always whitespace-normalize key expression before searching: we strip leading and trailing whitespace and we compact inner whitespace sequences. In perl we would do that by:
$var =~ s/^\s+//g;
$var =~ s/\s+$//g;
$var =~ s/\s+/ /g;
There’s no point to search for a short-id or email address until it looks like an ACIS short-id or an email address.
We use a JavaScript equivalent of the following Perl-style regular expression for matching email addresses:
/^\s*([\&\+a-z\d\-\.\=\_]+\@(?:[a-z\d\-\_]+\.)+[a-z]{2,})\s*$/i
For matching ACIS personal short-ids we use this regular expression:
/p[a-z]+\d+/i
This level’s goal is to notify an ACIS service about an updated eprint record. An updated eprint record here means a metadata file, to which a new or edited eprint record has been just exported.
So, it is as an extension to the ACIS::EPrints::MetadataExport::AMF module, introduced at level 1. The MetadataExport::AMF module writes a metadata file and then immediately notifies an ACIS service about it. We use the ACIS::MetaUpdate::Request module to actually send the request.
Via the $c variable in get_conf() function in the
cfg/ArchiveConfig.pm file of the EPrints archive:
 $c->{eprint_metadata_export_AMF_metaupdate} = {
            'request-target-url' => 'http://acis.super.org/meta/update',
            'archive-id'         => 'michigan',
            'log-filename'       => '/opt/eprints/archives/History/super-org-metaupdate.log',
            'object-dir-levels'  => 1,
 };
Here three first items: request-target-url,
archive-id and log-filename are
configuration for the ACIS::MetaUpdate::Request module.
You can also configure the ACIS::MetaUpdate::Request module
via the $ACIS::MetaUpdate::Request::CONF variable
(details).
object-dir-levels
parameterThe object-dir-levels parameter helps us to
calculate the update request OBJECT value from the absolute
path of a just written AMF file. It specifies how many
levels of directory structure will be included into the
OBJECT. If object-dir-levels is 0, the OBJECT will
just include the name of the AMF file (something like
"100.amf.xml").
But if, for example,
$c->{eprint_metadata_export_AMF_dir} is
"/opt/eprints/metadata/amf/History/" and
object-dir-levels is 1, and the AMF file
written was
"/opt/eprints/metadata/amf/History/100.amf.xml",
then OBJECT will be "History/100.amf.xml".
It means the ACIS service, to which the update request is
sent, will try to retrieve
"History/100.amf.xml" from us, the document
service archive.
Default value for object-dir-levels is 0.
It is up to the EPrints service administrator and the ACIS service administrator to agree on a transport technology for the data files between the services. We assume the simpliest case here: an exported file becomes immediately available for retrieval by ACIS, probably via a public web server. All what is left is to notify ACIS about it.
$Id$
Generated: Wed Aug 29 22:59:09 2007
ACIS project, acis@openlib.org